
準備性重構範例
2015 年 1 月 5 日

有各種方式讓 重構融入我們的程式設計工作流程。一個有用的概念是準備性重構。這是我在新增新功能時,發現現有程式碼的結構並未以利於新增功能的方式組織。因此,我首先將程式碼重構成便於新增功能的結構,或者正如 Kent Beck 精闢地說:「讓變更變得容易,然後再進行容易的變更」"make the change easy, then make the easy change"。
在最近的 Ruby Rogues podcast 中,Jessica Kerr 提供了一個關於準備性重構的絕妙比喻。
這就像我想往東走 100 英里,但不是直接穿越森林,而是先往北開 20 英里到高速公路,然後以比直接前往時快三倍的速度往東走 100 英里。當人們催促你直接前往時,有時你需要說:「等等,我需要查看地圖並找出最快的路線。」準備性重構對我來說就是這樣。
-- Jessica Kerr
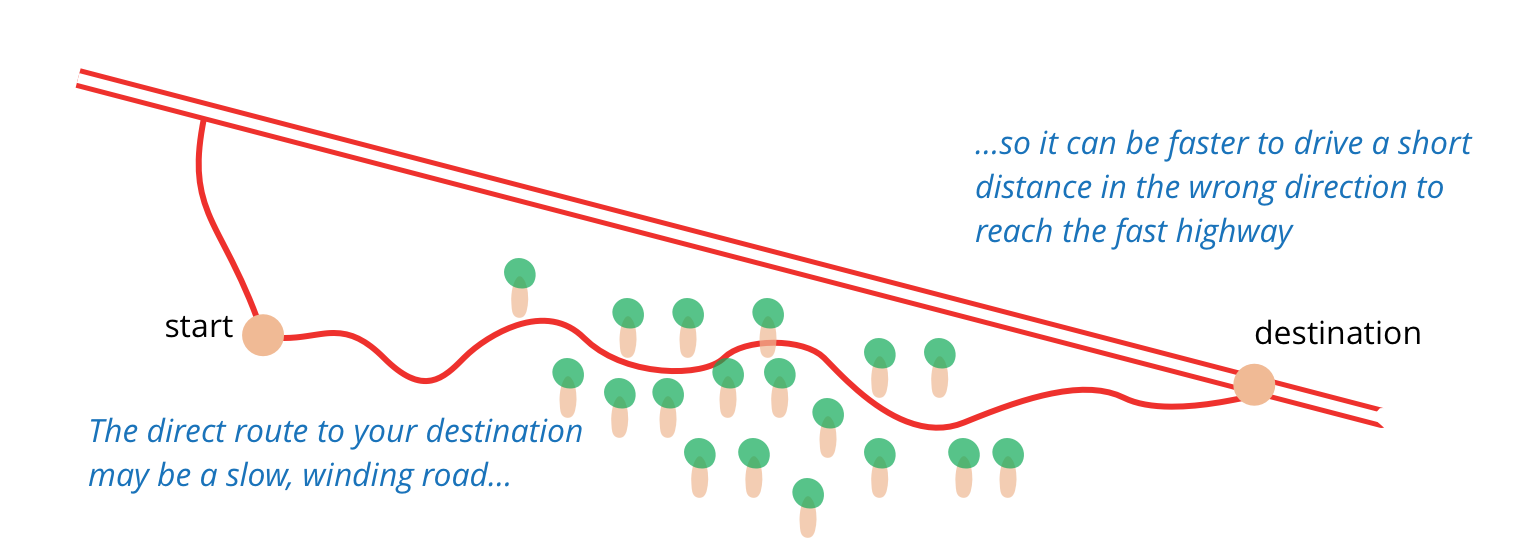
我遇到的另一個好比喻是在粉刷牆壁時,用膠帶貼住插座、門框、踢腳板等。貼膠帶並非在粉刷,但透過花時間先遮蓋物品,粉刷可以更快更容易。
一般性的說法和比喻都很棒,但最好能舉例說明。最近我自己也遇到一個例子,我覺得可能值得分享。
起點
我的出版工具鏈包含將來自動檔案的程式碼插入文章的功能。所謂「自動檔案」,我指的是編譯和執行中的程式碼,通常是教學(例如玩具)範例。能夠從自動檔案中擷取程式碼非常有幫助,因為它避免了複製貼上的問題,並讓我確信文章中的程式碼是實際編譯並通過測試的程式碼。我透過註解中包含的標記來標記程式碼區段。 [1]
我現在新增的功能是能夠突顯這些程式碼片段的特定部分。這樣我就可以取一行或程式碼行的一部分,並在 html 中用 span 元素將其包圍,然後使用 css 突顯它。你會在本文後面的範例中看到我這麼做,因為在討論重構時特別方便。
在這裡我談到的程式設計情節的開頭,我已經有能力突顯給定行或給定行內的程式碼範圍。我想新增第三個功能,以突顯一範圍的行。
在我的文章原始文件中,我指出我想使用 insertCode XML 元素插入程式碼片段。我目前的突顯功能允許我定義一堆突顯。以下是一個範例
<insertCode file = "Notification.java" fragment = "notification-with-error">
  <highlight line="add\(" span="new.*e\)"/>
  <highlight line="map"/>
</insertCode>
這會突顯類似這樣的程式碼
public void addError(String message, Exception e) {
  errors.add(new Error(message, e));
}

public String errorMessage() {
  return errors.stream()
          .map(e -> e.message)
          .collect(Collectors.joining(", "));
}
insertCode 元素有檔案路徑和我要萃取的片段名稱的屬性。然後我可以使用子元素指定突顯。每個突顯都透過提供一個我用來比對行的正規表示法來指定一行。我可以提供一個 span 屬性,另一個正規表示法,這種情況下突顯只針對比對到該正規表示法的行部分。如果我沒有提供 span,突顯會套用至整行。
我已經將執行突顯的程式碼放入它自己的類別中。一些獨立的程式碼(我們不必擔心)從原始檔案萃取程式碼片段,然後查看我們是否需要任何突顯,如果是,它會建立一個 CodeHighlighter 物件並告訴它執行突顯。呼叫程式碼突顯器看起來像這樣
output << CodeHighlighter.new(insertCodeElement, codeFragment).call
這是使用方法物件模式,我在其中使用一個物件來表示一級函式。我使用該函式的引數建立物件,呼叫另一個方法來執行函式,該函式會傳回結果,然後讓方法物件被垃圾回收掉。
以下是該突顯器的實作
class CodeHighlighter
  def initialize insertCodeElement, fragment
    @data = insertCodeElement
    @fragment = fragment
  end
  def call
    @fragment.lines.map{|line| highlight_line line}.join
  end
  def highlight_line line
    highlights
      .select{|h| Regexp.new(h['line']).match(line)}
      .reduce(line){|acc, each| apply_markup acc, each}
  end
  def highlights
    @data.css('highlight')
  end
  def apply_markup line, element
    open = "<span class = 'highlight'>"
    close = "</span>"
    if element.key? 'span'
      r = Regexp.new(element['span'])
      m = r.match line
      m.pre_match + open + m[0] + close + m.post_match
    else
      open + line.chomp + close + "\n"
    end
  end
end
工具鏈程式碼是 ruby,它使用 Nokogiri 函式庫來處理 XML
我沒有太擔心這裡的邊界情況,例如如果我指定多個突顯以會搞亂顯示的方式重疊。畢竟,如果我遇到任何這些問題,我知道我住在哪裡。寫程式碼的奢華就在於我是唯一的使用者。
測試螢光筆
測試突顯器非常簡單,它是一個純函式,會接收一些輸入並發出一些輸出。但是我在測試類別中放了一點工具,讓撰寫測試更容易。第一件事是我喜歡將輸入和輸出的文字塊保存在一個獨立的檔案中,如下所示
codeHighlighterHunks.txt…
  input

    private void validateDate(Notification note) {
      if (date == null) {
        note.addError("date is missing");
        return;
      }

      LocalDate parsedDate;
      try {
        parsedDate = LocalDate.parse(getDate());
      }
    } //end

  %% one-line

    private void validateDate(Notification note) {
      if (date == null) {
  <span class = 'highlight'>      note.addError("date is missing");</span>
        return;
      }

      LocalDate parsedDate;
      try {
        parsedDate = LocalDate.parse(getDate());
      }
    } //end

  %% one-span

    private void validateDate(Notification note) {
      if (date == null) {
        note.<span class = 'highlight'>addError</span>("date is missing");
        return;
      }

      LocalDate parsedDate;
      try {
        parsedDate = LocalDate.parse(getDate());
      }
    } //end
  …
在這裡,您會看到三個文字段落,以 %% 分隔。第一個段落是我的(第一個)輸入字串,接下來的兩個段落是針對一行和一行中的跨距所發生的情況而產生的輸出。每個段落都有金鑰,也就是該行 %% 之後的文字。然後,我可以在測試人員類別中輕鬆取得這些段落
class CodeHighlighterTester…
  def hunks
    raw = File.read('test/codeHighlighterHunks.txt').split("\n%%")
    raw.map {|r| process_raw_hunk r}.to_h
  end
  def process_raw_hunk hunk
    lines = hunk.lines
    key = lines.first.strip
    value = lines
      .drop(1)
      .drop_while {|line| (/[^[:space:]]/ !~ line)}
      .join
    return [key, value]
  end
由於可以輕鬆擷取段落,因此可以在測試中參照它們。
class CodeHighlighterTester…
  def test_no_highlights
    assert_equal hunks['input'], with_highlights(form_element(""))
  end
  def test_one_line_highlight
    element = form_element "<highlight line = 'missing'/>"
    assert_equal hunks['one-line'], with_highlights(element)
  end
  def test_highlight_span
    element = form_element "<highlight line = 'missing' span = 'addError'/>"
    assert_equal hunks['one-span'], with_highlights(element)
  end
  def form_element s
    Nokogiri::XML("<insertCode>" + s + "</insertCode").root
  end
  def with_highlights element, input = nil
    input ||= hunks['input']
    CodeHighlighter.new(element,input).call
  end
我可以用多行字串或此處文件來執行這項工作,但我認為文字段落比較容易處理。
新增螢光筆範圍
我想新增的新功能是像這樣突顯多行範圍。
<insertCode file = "BookingRequest.java" fragment = "done">
  <highlight-range start-line = "missing" end-line = "return"/>
</insertCode>
開始行和結束行屬性又是正規表示式,用於比對範圍中的第一行和最後一行。
我從為新的標記行為新增測試開始,檢查它是否失敗,然後標記為略過。我喜歡從撰寫最終行為測試開始,因為這可以明確告訴我想要的結果是什麼,以及我希望 API 如何運作。但是,如果我要執行任何準備重構,我不想讓該測試的失敗混亂我的測試輸出,因此在看過它失敗一次後,我在處理它的時候會略過它。
class CodeHighlighterTester…
  def test_highlight_range
    skip
    e = '<highlight-range start-line = "(date == null)" end-line = "}"/>'
    assert_equal hunks['range'], with_highlights(form_element(e))
  end
codeHighlighterHunks.txt…
  %% range

    private void validateDate(Notification note) {
  <span class = 'highlight'>    if (date == null) {
        note.addError("date is missing");
        return;
      }</span>

      LocalDate parsedDate;
      try {
        parsedDate = LocalDate.parse(getDate());
      }
    } //end
當我在思考如何處理時,我首先決定可以將程式碼突顯視為對所提供文字進行一系列轉換的順序。我首先可以套用任何突顯範圍轉換,然後再使用現有的突顯。現在,我可以將這個想法從我的腦海轉移到程式碼。
我的第一步是簡單地在 call 的整個主體上使用 Extract Method
class CodeHighlighter…
  def call
    apply_highlights @fragment.lines
  end
  def apply_highlights lines
    lines.map{|line| highlight_line line}.join
  end
現在,我引入一個巢狀的 no-op 函式,也就是一個只會傳回您給它的內容,而不會有任何變更的函式。
class CodeHighlighter…
  def call
    apply_highlights(apply_ranges(@fragment.lines))
  end
  def apply_ranges lines
    lines
  end
這個單一重構真的是整篇文章的精華,簡化為一個簡單的步驟。透過這個重構,我做了幾件事。首先,透過將 apply_ranges 方法放入呼叫中,我為新的功能建立了一個位置。但是,其次,而且可能更重要的是,我立即以這樣的方式實作這個新函式,以保留目前的行為。在某種程度上,這種輕鬆插入佔位符函式的能力是將突顯行為結構化為一系列較小轉換的優點之一,這也是 Pipes and Filters 模式 是結構化計算如此強大的方式的原因之一。
透過使用這個簡單的保留行為實作來定義 apply_ranges,而不是讓它空白,我可以繼續執行測試並戴上我的重構帽子。
我可能有多個要套用的範圍突顯元素,因此我會讓每個元素組成在其他元素之上。
class CodeHighlighter…
  def apply_ranges lines
    highlight_ranges.reduce(lines){|acc, each| apply_one_range(acc, each)}
  end
  def highlight_ranges
    @data.css('highlight-range')
  end
  def apply_one_range lines, element
    lines
  end
您會看到我再次執行相同的技巧,我透過減少執行每個範圍突顯元素的 apply_one_range 結果來實作 apply_ranges。我提供保留現有行為的 apply_one_range 初始實作,並戴上我的軟呢帽。我正在做的是穩步縮小我即將新增的行為變更範圍。
在這個時候,我為範圍突顯條件新增一個無操作測試。
class CodeHighlighterTester…
  def test_highlight_range_noop
    e = '<highlight-range start-line = "(date == null)" end-line = "}"/>'
    assert_equal hunks['input'], with_highlights(form_element(e))
  end
這看起來可能是一個奇怪的動作,基本上這個測試所說的是,當我新增一個範圍突顯元素時,我不希望輸出有任何變更。這是一個暫時性的測試,只是在我進行準備性重構時。在我進行這個重構時,我根據假設進行操作,即我所做的重構將不會造成任何變更,即使元素存在時也是如此。因此,我想透過測試來確認這個假設,因為撰寫測試非常容易。(這遵循我的普遍規則:如果我曾經有想執行程式碼並查看一些輸出以查看事情是否正確的衝動,我應該改寫測試。透過測試,電腦可以檢查輸出是否正確,因此我不必這麼做。)
我的下一步是回到高亮顯示器本身。我現在已孤立一個方法來突顯單一範圍。我想接下來要做的就是找出我想新增開啟標籤的行,並將這些行分成三個清單:已比對的行之前、該行本身,以及已比對的行之後。我稍後會擔心關閉標籤。
class CodeHighlighter…
  def apply_one_range lines, element
    start_ix = lines.find_index {|line| line =~ Regexp.new(element['start-line'])}
    pre = 0 == start_ix ? [] : lines[0..(start_ix - 1)]
    start = [lines[start_ix]]
    rest = lines.size == (start_ix + 1) ? [] : lines[(start_ix + 1)..-1]
    return pre + start + rest
  end
這種重構的精髓在於將文字分解,然後再重新組合,直到我將其分解到適當的點,以便加入新的行為。
透過這樣做,我可以測試我是否能正確地將清單中的行分解成各個部分,然後再將它們重新組合。由於並非總是會有三個部分,因此這比你一開始想像的還要困難一些。由於我必須加入條件式邏輯來檢查範圍是否從第一行或倒數第二行開始,因此我加入了一些測試來檢查這些情況。
到目前為止,我只檢查了開頭,而且幾乎已準備好實際變更可觀察的行為,但首先我需要將 html span 字串移到物件範圍中的某個位置。
class CodeHighlighter…
  def apply_markup line, element
    open = "<span class = 'highlight'>"
    close = "</span>"
    if element.key? 'span'
      r = Regexp.new(element['span'])
      m = r.match line
      raise "unable to match span %s" % element['span'] unless m
      m.pre_match + opening + m[0] + closing + m.post_match
    else
      opening + line.chomp + closing + "\n"
    end
  end

  def opening
    "<span class = 'highlight'>"
  end
  def closing
    "</span>"
  end
我可以將它們設為常數,但我的習慣是在這種情況下只使用方法。 [2]
現在我終於準備好戴上安全帽了,而我需要做的變更太過於微不足道,以至於無法輕易完成。
class CodeHighlighter…
  def apply_one_range lines, element
    start_ix = lines.find_index {|line| line =~ Regexp.new(element['start-line'])}
    raise "unable to match %s in code insert" % element['start-line'] unless start_ix
    pre = 0 == start_ix ? [] : lines[0..(start_ix - 1)]
    start = [opening + lines[start_ix]]
    rest = lines.size == (start_ix + 1) ? [] : lines[(start_ix + 1)..-1]
    return pre + start + rest
  end
現在我移除了幾分鐘前加入的無操作測試,並修改跳過的測試,使其僅包含開頭。
class CodeHighlighterTester…
  def test_highlight_range
    skip
    e = '<highlight-range start-line = "(date == null)" end-line = "}"/>'
    assert_equal hunks['range'], with_highlights(form_element(e))
  end
codeHighlighterHunks.txt…
  %% range

    private void validateDate(Notification note) {
  <span class = 'highlight'>    if (date == null) {
        note.addError("date is missing");
        return;
      }</span>

      LocalDate parsedDate;
      try {
        parsedDate = LocalDate.parse(getDate());
      }
    } //end
這個測試允許我在加入關閉標籤之前進行一些準備性重構。
class CodeHighlighter…
  def apply_one_range lines, element
    start_ix = lines.find_index {|line| line =~ Regexp.new(element['start-line'])}
    raise "unable to match %s in code insert" % element['start-line'] unless start_ix
    finish_offset = lines[start_ix..-1].find_index do |line|
      line =~ Regexp.new(element['end-line'])
    end
    raise "unable to match %s in code insert" % element['end-line'] unless finish_offset
    finish_ix = start_ix + finish_offset
    pre = 0 == start_ix ? [] : lines[0..(start_ix - 1)]
    start = [opening + lines[start_ix]]
    mid = (lines[(start_ix + 1)..(finish_ix -1)])
    finish = [lines[finish_ix]]
    rest = lines.size == (finish_ix + 1) ? [] : lines[(finish_ix + 1)..-1]
    return pre + start + mid + finish + rest
  end
對我來說,這個方法有點長,但我不知道如何明智地縮短它。它確實讓所有東西保持綠色,並為我最後的簡單變更做好準備。
class CodeHighlighter…
  def apply_one_range lines, element
    start_ix = lines.find_index {|line| line =~ Regexp.new(element['start-line'])}
    raise "unable to match %s in code insert" % element['start-line'] unless start_ix
    finish_offset = lines[start_ix..-1].find_index do |line|
      line =~ Regexp.new(element['end-line'])
    end
    raise "unable to match %s in code insert" % element['end-line'] unless finish_offset
    raise "start and end match same line" unless finish_offset > 0
    finish_ix = start_ix + finish_offset
    pre = 0 == start_ix ? [] : lines[0..(start_ix - 1)]
    start = [opening + lines[start_ix]]
    mid = (lines[(start_ix + 1)..(finish_ix -1)])
    finish = [lines[finish_ix].chomp + closing + "\n"]
    rest = lines.size == (finish_ix + 1) ? [] : lines[(finish_ix + 1)..-1]
    return pre + start + mid + finish + rest
  end
最後的想法
我希望這個小插曲能讓你對準備性重構是什麼樣子有一些概念
對於每個所需的變更,讓變更變得簡單(警告:這可能很困難),然後進行簡單的變更
-- Kent Beck
我透過建立一個無操作函數來讓變更變得簡單,這個函數只會傳回給它的內容,然後分解這個函數,逐漸將其分解,同時仍保留其無操作性。然後,一旦加入新功能變得簡單,它就會輕鬆地加入其中。
每一個準備性重構的章節都不相同。有些花費幾分鐘,有些可能花費數天。但我發現,當我能找出如何進行準備性重構時,它會帶來更快速且壓力較小的程式設計體驗,因為軟呢帽比安全帽更快且壓力較小。
註腳
1: 這裡有一個有趣的反諷,在於當我描述像這樣的重構時,這種方法並無法很好地發揮作用。我仍然使用程式碼匯入機制,因為我在撰寫時發現將程式碼與文字分開很方便,但我必須從(已死的)片段檔案中將其拉入。
2: 您可能想知道這段程式碼如何允許我以刪除線突出顯示某些程式碼,就像我在這裡所做的那樣。當我撰寫這篇文章時,我才將該功能新增到程式碼高亮顯示器中。(我透過新增屬性來指定 CSS 類別來執行此操作。)
重大修訂
2015 年 1 月 5 日:首次發布